Friday, 30 September 2011

Friday and its a heatwave!

Here you see by Friday morning Bob had laid  one layer of breeze blocks outling the path of the back wall . Once this has been in place for a few days we will filll in behind the wall - it all has to be done at the right spped - a rushed job is a bad job!

Well today saw the arrival of the bricks
These are Surrey Red Multi from Ibstock  bob  ordered 2000 in all
and these have an F2 Classification for Durability

(Unlike BS 3921, where durability designation incorporated both frost resistance and
soluble salts content, BS EN 771-1 states that freeze-thaw resistance and active
soluble salts content are separately categorized.
FREEZE/THAW RESISTANCE
This must be declared by the manufacturer with reference to suitability under passive,moderate or severe exposure to saturation and freezing.
F0 Passive Exposure
F1 Moderate Exposure
F2 Severe Exposure
F2 is deemed frost resistant in all normal building situations when used in accordance with the appropriate Codes of Practice. )

So to sum up these bricks while quite decorative are more like engineering bricks with a high frost resistance
Here you see the start of the brickwork being laid in a corner with the Breeze block acting as the inner wall.
This wall is destined to grow a lot next week.


Thursday 27 - Finishing off the Foundations

On Thursday Bob was back to finish of digging out the last 20% of the wall footings
Liam mixing the concrete and laying them.
Here you see that the footings are completed .
The next step was to get rid of the last of the spoil from the excavations .
Here you see the man of Digby Services from Penn loading up his wagon with our unnwanted bits of chalk


With all the diging done, at last we can start to build walls, here you see the first layer of bricks being put in place.
The breeze blocks which will hold up the earth are shown being cemented on to the reinforcing rods which will be fixed to the decorative front walls with steel ties.

My dad who was a clerk of works for many years would have approved of the strength being built into this wall.
Tomorrow the bricks are coming and hopefully the brickies to lay them - next week


Sunday, 25 September 2011

The Missing Brick

I promised the guys from National Grid that I would repair the brick that got damaged (so no need to send a second crew) when they drilled the hole for the new gas pipe. As you can see  unfortunately the front half of the brick fell off- They were still able to fix the gas supply.

So on Saturday I mixed up a little morter mix and carefully filled up the front half of the brick, I did my best to make it as brick like as possible
I also carved our names in the foundation  on this great building work so  in 150 years our names will live on  - provided someone decides to demolish the wall that will obscure our names next week.


Friday, 23 September 2011

We Are Now Officially Landscaping

Today is the day that we started really preparing the Drive.  Bob and his digger arrived first thing to finalise the chalk walls in preparation to digging the footings the  little digger was going to be busy.

As a man to do things properly Bob dug out a trench bout 30 cm deep and 50 cm wide for the footings - here you see that my head is abot 30 cm below ground level. it looks like the start of some sort of cave...

Having dug out the foundations Bob then started with Liam's help to mix a lot of concrete he reckons that today they mixed around 3 tonnes of the stuff
You will see the now very big pile of chalk that shows how substatial the footings will be.
These two pictures show the footings being laid, this carried on all day with Bob the digger digging the trench for the footings andLiam both mixing up the Concrete,( lots of ballast and and cement got used)  as he poured the concrete  and the footings were gradually laid round the edge of the new drive - I agree that to describe what we have here as a new drive is maybe premature but we do progress!
So after 1 day of hard Crafting we have most of the footings in place. With reinforcement rods stuck in to the footings that will link in to the breezeblock retaining wall to hold up the earth - later the facing bricks will form the visible face and top of the wall - it will be very interesting to follow what happens.
My own  contribution today was to go and buy the required cables for the lighting so that this would be available for when the brickies come to build the wall. On the advice of Richard the electrician I went to Contact Electrical Supplies who were able to provide me with the two cables i needed - Flexible 3 core and aoured cable need to check with Richard if i need to buy a sensor as well.

Thursday, 22 September 2011

Turning on the Tap *Sods Law


Sod's law => the theory that if something can go wrong it will go wrong


I was very happy to aagin have mains water The next two steps were to flush out the new water pipe and then to isolate the old valve and  then finally open the valve to allow the mains water into the house
.
The picture on the left shows   from bottom to top the different taps now installed in the garage. 
Firstly we have the stopcock to isolate the external supply
Secondly we have the drain with small square tap to flush the new mains pie,
Thirdly an isolating valve to prevent any dirty water from entering the system
Fourthly a non return valve to ensure that there was no risk of water being sucked back during the flushing operation
(gets complex does n't it)

So having isolated the old mains tap inside the house  I made sure the isolating valve was off I connected my green hose to the drain and let the water run for around 10 minutes to ensure all traces of grit were gone,I then closed it off , opened the isolating valve and went inside to check the water - No water.


After various attempts - I thought it could be an air lock - I gave up and called Gary the plumber who investigated and discovered that he had fitted a one way valve that did not work - the reason it did not work is that the manufacturer had inserted the one way valve the wrong way .
If you look at the non return  valve in the close up picture you will see  an arrow pointing up this indicates the direction the water is able to flow, but as the valve inside had been fitted the wrong way in fact it stopped the water all together.
Gary removed the valve turned it round and fitted it the "wrong way" and the result was now everything worked.
Gary also tested the pressure which was around 3 bar so this means that we have a good connection to the water main.
So quite an epic
Thanks again to Gary for his quick response and speedy identification of the problem


United Utilities & Thames Water
Here is Bill or maybe Shane doing what Thames Water asked them to do, which was to conect my blue pipe. -  this they did to the existing 18mm copper - unfortunately no-one apparently told them that I had asked to connect it to the meter -
(In fact thames water charged my the £500  because they told me that they were charged that by the local council because they made a whole in the footpath ., So just as well I was there -
To their credit Once I explained what I wanted
  they quickly went to work digging up the footpath and connecting my pipe into the meter; they put in a right angle bend to take the pipe down to the prepared trench
Below you see the dug up foot path and the connecting  blue poly pipe to the meter
On the right  you see the tarmac machine used to compact
the tarmac and below the finished job
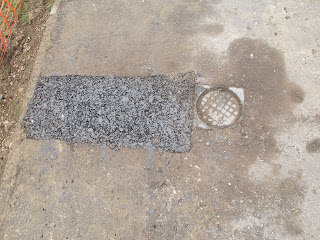
Finally they filled the whole and made a nice neat job of compacting the tarmac
This means that finally all the work for the utilities was completed Bob(Craft Paving) dropped round to have a look at what had been done and let me know that the foundation work would start on Friday.
Now we are down to just two local tradesperson Bob from Craft Paving and the Electrician to help wire the lights


Wednesday, 21 September 2011

All Utilities Connected!
But its too late to tell you what happened - the full story tomorrow. In fact it was not Thames Water who did it but  two guys from Ultimate Utilities - They explained they were the subcontractors subcontractor


More about what happened in the next post.

Monday, 19 September 2011

Thames Water are Coming

On Friday I got the news that Thames Water will come and conect my shiny new water pipe to the water main, so I am expecting that by wednesday evening-( 21st) all the services will have been moved.

What an Epic....

This means that Bob Craft will be able to start work on the brickwork this week. First step will be to mark out the position of the retaining walls before putting the footings (foundations) of the wall in place,  - next week we should get down to serious wall building!

Thursday, 15 September 2011

What Gary did.
With all the excitement of Thames Water on Monday I realised that I never explained what Gary did inside the House  and  garage, to prepare for the switch over from the old main to the new one.

Here you see the Stopcock that the external
Plumber fitted -  you see the new mains water pipe disapearing into the newly laid concrete, this pipe then goes into the 600mm deep trench that runs from the house to the road. Once connected the mains water will come in here and then be piped to the rest of the house. To change over to the new supply I first have to somehow drain off any soil/sand/grit  that might contaminated the pipe while it was being fitted and then switch the supply from the old pipe (that will now be  disconnected ) to the new one.
Thanks to Gary I will be able to do that.

These are the steps:
First turn off the old supply inside the house.
Second get Thames  Water to conect the new pipe.

Third make sure the  isolating valve is set to off and then fix a hose to the drain on the stop cock.

Turn on the mains in the street
Fix then feed the temporary hose out the door to a drain and then turn on
Leave for 10-15 mins to ensure all grit sand dirt is flushed away
Turn off stopcock.
Remove hose and then close hose valve.
Open Stopcock check that drain valve is shut ,
Then finally open isolating valve alowing water from new mains into house via the tempoary hose
running from the garage into the House

Tommorrow I plan to get my fix date from Thames Water will let you know how I got on.

Wednesday, 14 September 2011

Thames Water RemEdial Works

The approval certificate was given on Monday with two  conditions
  1. That I dug out the last 1m in the elevated bank up to the footpath (I assumed Thames Water would use some sort of mole device bu it seems not to be the case.
  2. That where the water pipe was less than 750mm below ground I had to encase this in a conduit
    This meant diging out all the infill above the new pipe.,
Considering my previous pipe was 50 mm below ground and the pipe coming from the existing mains is only 500mm we clearly have one rule for Thames water and another for me - you dig we do'nt dig
So yestereday evening I did dig out the last 1M of soil and rediscovered the GAS pipe - if you look at the picture you will see that the water pipe was laid on (resting)  the gas pipe - one does wonder what standards were in place in the mid sixties.

I had some electrical plastic conduit which I was told would be sufficient but as it had electrical cables printed on it  I decided to paint it blue (to avoid confusion in late years and to make a stencil for the word water

Here is my stencil
I printed it using the font Stencil stuck it on to the Cardbord and then cut out athe letters
I then tested this on a spare Brick using some gold paint - much to my surprise it seemed to work,
 I painted  the conduit blue and using my template printed  Water on the pipe
the reult was surprisngly good

Now to get ready for the conduit  i had to dig out all the in-fill above the new pipe and get this as low as i could ready to slide on the conduit
below you see the hole dug down to the level at which the new water pipe goes through the foundations
I will have the final pictures of all this in place tomorrow  , On the left  is a picture for Steve, the Thames water inspector to prove i dug out all of the in-fill above the new pipe, tomorrows picture will show the new conduit in place - so by Tomorrow evening I will have completed all the things requested by Thames Water .
Now in the words of Daniel my old Boss in France - "Just give me a date...." Please!

If anybody likes the blog please leave me a comment!

Thames water Planning


I think I told you yestrerdaythat I did get my approval certificate from Thams Water - this is authorization to place an order to the Thames water planning dept to get them to organise the connection.  I filled out  the form added my cheque for £500 and this was posted at the local post office before 4pm so was on time to catch next business Day post. It arrived at Thames water the following morning 7:25.
I waited till lunch time as I was sure internal procssing would take a few hours, when I called I was told that;  yes they had my form; yes they had my cheque;  no they would not talk to me to try and plan the works until the cheque had cleared. I offered to pay again electronically but was told they did not take electronic payments of card payments - For an organisation of this size it is unbelievable - considering that they can sell you a water pipe protection policy completely on line but can only manage a re-connection by Post.
 I explained again what had happened and  the lady at Thames Water talked  to the planning office and said the probably it should be done before next Friday (thats the 23rd)... but no commitment till my cheque cleared - I am not very impressed. I hope that they give me a pleasent surprise in the next few days - other work is now stopped waiting for Thames Water.

Monday, 12 September 2011

What a Stopcock

Well today was meant to be water day - the day that Thames Water had promised to send a man to connect my new pipe provided I give him a cheque for £500 (because my local council charge them that)
Buckinghamshires best plumber/ Heating Engineer/Gas expert  Gary  arrived in the morning to prepare the pipework necessary to go from the new stockcock in the garage to the existing supply inlet, that all went very well with a new temporary pipe conecting the stopcock to the house supply in place  by lunchtime.  Thames water was another story..

Steve (Mr Thames Water) called me just before he arrived at 13:45 and on arrival he explained to me that he was not a fitter - I offered him £500 as advised by the call centre but he told me that for some reason Inspectors were not allowed to take money! It dawned on me that things were not going well.

Steve then explained that there was actually a four step process
  1.  Book your survey (I discovered that that was what I had done last week)
  2. Get your Survey and and get your reconnection certificate
  3. Sign this approval form  add the famous £500 and post it to Thanes Water
  4. They will then plan the work and give you a date
  5. Come and make the connection..
My opinion of the great Thames Water Customer service that I described in my previous Post has evaporated as the water pipe which by now should have disappeared remains firmly elevated 5 feet above my drive. ..

Steve explained to me that his job was to ensure that the trenches and intenal stopcocks in the house were in line with Thames Water requirements - the mean that everything was to be  750mm deep, we checked the trench and I  explained  that in the end we would have 750mm above the pipe, he was concerned about the depth of the pipe where it entered the garage and he agreed to pass the pipeline preperaton provided I enclose the pipe in a protective conduit to provide additional insulation.( the old pipe was 50mm below the surface so clearly whatever regulations existed in 1960 were ignored , wth hindsight I think I was lucky that this old pipe did not freeze.
So finally Steve told me that provided I complete the agreed works he would issue the certificate.(Thanks Steve)

The signed certificate was posted this afternoon around 16:00  and should be with Thames Water tomorrow morning I will let you know if they come back with a good date tomorrow.
This could potentially delay the project if we cannot get the new pipe connected and buried as this we would pefer to re-align all the services before we continue with thefootings for the walls

So just when I thought that all my utility planning had suceeded it turns out that it was only 2 out of 3 - Something goes wrong in Thames Water Customer Service.

Sunday, 11 September 2011

Its the weekend
Well the weekend is meant for rest and recuperation but not for me .. I am expecting Thames Water to come Monday afternoon to conect my new 25mm pipe that replace my 12.5mm pipe, so I thought I had better check out the regulations

Here you see that water pipes must be 750mm below ground that is  30" in imperial. As the new drive will go on top of the trench I do not have to dig as much as that, I estimate that the blocks 75mm plus sand 70mm, plus scalpings layer75mm (225mm) means I have to dig a 525mm trench I dulymeasured my trench and discovered it was nearer to 300mm this meant lots of digging this weekend to be ready for Thames Water on Monday - they have the right to check the pipe preperation and refuse to conect if its not in line with their regulations (above)
Here I am with an almost finshed trench.

Between yesterday and today Ihave filled the large yellow bag (1 cubic metre) with chunks of chalk I have also riddled out fine bits of chalk to mix with the sand to line the pipe before its burial
So Finally after a lot of digging  I have broken the

500 mm depth barrier so I assume the man from Thames water will be happy to connect the new Blue pipe - What is odd is to see our existing water pipe 12.5mm copper hanging in the air by tomorrow evening it should be gone.
 Below you will see the pipe in the now deeper trench waiting to be connected tomorrow 
The other thing scheduled for tomorrow is the re-routing of The main supply pipework in the house - You may remember that we have installed a new mains water stopcock in the garage  (stopcock) this now needs to be reconnected to the existing pipework in the house. Our favourite Plumber /gas central heating engineer is coming to work out how we should do this - It will be interesting


Friday, 9 September 2011

The leccy* Men Come
Today Friday was Electricity day and I decided as I wanted to work from Home in the morning that I would need to arrange an alternative power supply;

I thought of Solar power - wrong country,
wind power - no nearby wind farm

So I settled instead for a power Socket n my neighbours garage and with the help of two reels of cable was able to set up an externally powered office running my broadband modem and laptop off my new temporary electricity.(thanks Pete)

*Scottish slang for Electricity employee

I think I have already explained that while I pay Scottish Power for both my gas and electricity the local power network is provided and maintained by Scottish and Southern energy.
So before 9 my door bell rang and Ken & Simon (thanks guys) arrived to make the two joins to allow the lowering of the cable.
Unfortunately I was participating in a teleconference so I was not able to take many pictures at the start, I was however able to get some pictures of the re-connection process


I realised that the join was going to be made by
the Company I used to work for in Swindon
Below you will see the joint being prepared using Tyco (used to be Raychem) tubing


 Step one - prepare to cut the live wire originally I imagined they must pull some amazing fuse somewhere instead idiscovered  they wear specialist gloves and work very very carefully.  they first strip the cable and prepare the two wires, these are then cut and insulated seperately,here you see the cable being prepared by Ken
 Now comes the fun part using a blow torch to heat the previously expanded and irradiated tube allows the tube to shrink back to its unexpanded shape Tyco 's technology allows the polymer to "melt" but retains its original shape and if skillfully done - as here it will not burn


Here you see one end of the cable being prepared to be spliced into the connector
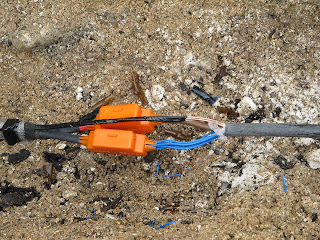
The next step is using the special connectors supplied with the Tyco connection kit if you look here you will see that each wire has its own connector
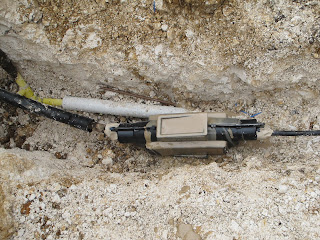
 Finally the splice is placed inside a plastic enclosure and this is filled with a special resin which is activated by the air and begins to cure
A lid is placed on the full cable splice and then the lid is sealed with some more resin
below you can see each step
The first picture shows the enclosure in place before the resin is added, the next photo shows the box being filled up


I wonder if Ken & Simon can tell whose splice box is whose - the question is does "youthful" enthusiasm beat "experience" :-) 


Anyway a great job done by Southern Electric so round of applause to Ken & Simon
the job was done quickly and profesionally.
Nice to have met you.


Only 1 utility company left and that is Thames Water they will come Monday after noon to connect the new water pipe to the water meter.